
What Gear Is Usually Used in a Shimano 11 Speed

A typical 9-speed rear cycle. The big bulge at one end of the hub identifies it every bit a freehub. This, and the size of the cluster means that the cogs are supplied every bit a cassette.

A cassette cog-set up and its splined (grooved) freehub. The splines let alignment of the cogs and prevent their rotation in utilize. The ratchet is in the bike's hub.
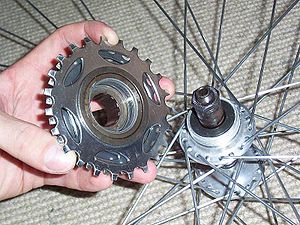
A freewheel cog-ready and its threaded hub. The freewheel itself contains both ratchet and cogs. Individual cogs are threaded onto the freewheel itself and the unabridged freewheel assembly is threaded onto the hub.
General
The freewheel is the ratchet device on the rear wheel that makes it possible to ringlet without pedaling, for example, when gratis-wheeling downward a hill. It operates whenever the wheels are going faster than the drive-force, in this case the pedals and chain. The term is as well used to draw a bike component that combines both a ratchet and a cog-set in one single spiral-on assembly, and this is the most commonly used significant. The alternative way of installing a cog-set up is to use a cassette, a stack of cogs that slides onto a splined hub. Whether a freewheel or a cassette is used on the rear hub of the wheel, there is e'er a ratchet; in the case of a freewheel assembly the ratchet is unscrewed with the cogs, whereas a cassette is merely a stack of cogs, and the ratchet is inside the freehub of the wheel. Cog pitch (hither is ways inter- cog heart-to-middle spacing) is the main consideration for shifting and apart from the restricted choice of freewheels, it is unimportant to the derailleur whether a freewheel or a cassette is installed, provided that the spacing between the cogs is right.
Bikes without gear-changing be, and so-chosen fixed-gear bikes or fixies. They accept one chain-ring and one rear cog. Although such bikes are not technically prevented from having a ratchet device, they usually take none, so that the rider's legs will be forced to rotate whenever the bicycle is moving. Some new riders of such bikes can find the experience agonizing.
The threaded hub of the freewheel installation is conspicuously different from the splined freehub of the cassette installation and the cog-set of i blazon cannot exist installed onto the other. When an upgrade from freewheels to cassettes is to be made, it is most user-friendly to practice so by changing the rear cycle for one with a freehub and cassette already installed. Examples of a freehub and of a threaded hub can be seen conspicuously in the side by side photographs.
Both freewheels and cassettes exist in a variety of cog combinations, and because chains are all half-inch spaced, cogs can be defined entirely by their numbers of teeth. For example, an 11T cog has eleven teeth, and a cog-set with a range of 11T-30T might have say, seven cogs, the smallest having 11 teeth and the largest thirty. Considering cog-sets have been in utilize for a long time, the virtually useful sets accept been identified by code letters, for instance, the higher up prepare is designated 'am'.
For those who need more than 7 rear cogs, a bike with a cassette becomes the choice. This is because bikes are rarely made with freewheels of more than seven cogs. Larger numbers of gears can be obtained even with a seven speed freewheel or cassette past only having more than front chainrings. For example, the combination of three front chainrings and seven rear sprockets provides 21 gear combinations (3 X 7), and enjoys the wider working tolerances of seven speed shifting at the rear.
This folio explains how to remove and fit cassettes and freewheels and provides links for further data on that subject. An introduction to the principles of indexed shifting is given, and notes on the complexity of gear-shifting standards is provided with the help of tables.
Cog-fix Standards. [edit | edit source]
Complexity [edit | edit source]
The hub of a rear wheel has an extension on information technology, and this is threaded or splined to fit either a freewheel or a cassette respectively. Extensions differ in length, co-ordinate to the number of cogs to be installed, but to maintain reasonable chain alignment and reduce the stresses on the hub, there is a limit to the extension that can be considered. So, when a number of cogs greater than say, seven, is crammed into a set, the teeth and spacers need to be made thinner. In this way the space or pitch between the cogs tin can be reduced. (Meet the table in the drop box below for a summary on cog-pitch.) A narrower chain is also needed for a narrower cog-pitch.
Although cassette cogs and most freewheel cogs can be replaced individually, doing so favors cassettes. Freewheel cogs demand two chain-whips to remove them from the cluster afterwards the freewheel itself if complimentary of its hub, one to unscrew the cog and another to preclude the freewheel from rotating; anyway, individual replacement cogs for freewheels are now hard to notice. Freewheels rarely exist across seven-speeds, while cassettes exist in up to 11-speeds. Cassette cogs are easier to remove, are abundant in supply, and offer the greatest scope for modification.
Cog pitch (hither means inter-cog spacing), cog thickness, and spacer thickness differ greatly for the various bicycle types, (see Sheldon Brown's Cribsheet on Spacing for detailed lists), not just for different sizes of cog-sets, but between different manufacturers for the same size of cog-prepare. Equally a effect, the derailleurs and shifters used differ greatly also. When the unlike shift ratios of derailleurs, cable-pull-lengths of shifters, and the pitch (inter-cog spacing) of cog-sets are considered together, it becomes clear that arbitrarily selected drive components will hardly e'er piece of work well together.
Examples of the various manufacturers' cog-pitches and the expected results of mixing drive gear tin exist constitute in the drop-box beneath. For the total description upon which these notes were based, see CTC on Rear Shifting. In the style of relief, some notes on the more than common footing are given in the next section.
| Pitch for Rear Cog-sets and Predicted Shifts for Mixed Bulldoze-gear | ||||||||||||||||||||||||||||||||||||||||||||||||||||||||||||||||||||||||||||||||||||||||||||||||||||||||||||||||||||||||||||||||||||||||||||||||||||||||||||||||||||||||||||||||||||||||||||||||||||||||||||||||||||||||||||||||||||||||||||||||||||||||||||||||||||||||||||||||||||||||||||||||||||||||||||||||||||||||||||||||||||||||||||||||||||||||||||||||||||||||||||||||||||||||||||||||||||||||||||
|---|---|---|---|---|---|---|---|---|---|---|---|---|---|---|---|---|---|---|---|---|---|---|---|---|---|---|---|---|---|---|---|---|---|---|---|---|---|---|---|---|---|---|---|---|---|---|---|---|---|---|---|---|---|---|---|---|---|---|---|---|---|---|---|---|---|---|---|---|---|---|---|---|---|---|---|---|---|---|---|---|---|---|---|---|---|---|---|---|---|---|---|---|---|---|---|---|---|---|---|---|---|---|---|---|---|---|---|---|---|---|---|---|---|---|---|---|---|---|---|---|---|---|---|---|---|---|---|---|---|---|---|---|---|---|---|---|---|---|---|---|---|---|---|---|---|---|---|---|---|---|---|---|---|---|---|---|---|---|---|---|---|---|---|---|---|---|---|---|---|---|---|---|---|---|---|---|---|---|---|---|---|---|---|---|---|---|---|---|---|---|---|---|---|---|---|---|---|---|---|---|---|---|---|---|---|---|---|---|---|---|---|---|---|---|---|---|---|---|---|---|---|---|---|---|---|---|---|---|---|---|---|---|---|---|---|---|---|---|---|---|---|---|---|---|---|---|---|---|---|---|---|---|---|---|---|---|---|---|---|---|---|---|---|---|---|---|---|---|---|---|---|---|---|---|---|---|---|---|---|---|---|---|---|---|---|---|---|---|---|---|---|---|---|---|---|---|---|---|---|---|---|---|---|---|---|---|---|---|---|---|---|---|---|---|---|---|---|---|---|---|---|---|---|---|---|---|---|---|---|---|---|---|---|---|---|---|---|---|---|---|---|---|---|---|---|---|---|---|---|---|---|---|---|---|---|---|---|---|---|---|---|---|---|---|---|---|---|---|---|---|---|---|---|---|---|---|---|---|---|---|---|---|---|---|---|---|---|---|---|---|---|---|---|---|---|---|
| The tables requite an introduction to the complexity of drive gear. Detailed lists for particular cog-sets are best found from manufacturers, or perhaps on the belatedly Sheldon Brownish'due south folio, Cribsheet on Spacings.
The above tables give the means to predict whether or not rear-gear shifting will piece of work with various combinations of shifters, derailleurs, and cogs. Because of the size limitations and difficulty in modifying freewheels, these tables refer in the chief to CASSETTES. The accent here is on closeness of pitch, and other practical factors might still need to be considered. The pitch of mutual cog-sets is given in ane tabular array and the derailleur shift data is given in some other. The shift data is divided into four main categories:
| ||||||||||||||||||||||||||||||||||||||||||||||||||||||||||||||||||||||||||||||||||||||||||||||||||||||||||||||||||||||||||||||||||||||||||||||||||||||||||||||||||||||||||||||||||||||||||||||||||||||||||||||||||||||||||||||||||||||||||||||||||||||||||||||||||||||||||||||||||||||||||||||||||||||||||||||||||||||||||||||||||||||||||||||||||||||||||||||||||||||||||||||||||||||||||||||||||||||||||||
| | To avoid most compatibility issues, stick to one manufacturer's components for the cog-ready, derailleur, shifter, and chain. Even then, since some manufacturers make items for more than than i shift ratio, information technology is wise to make sure that the derailleur and shifter combine to produce the cog-pitch that is intended. The tables in the in a higher place drop-box explain the indexing principles, and the adding of derailleur capacity based on the cog-ready is given elsewhere on this folio. |
| General Dominion |

A close-up of cogs clearly showing their ramps
Consistencies [edit | edit source]
Although complexity is the dominion as opposed to the exception, at that place are some consistencies in manufactured appurtenances. Examples include manufacturers who produce components that accommodate the drive-trains of others, a trend to standardize spline patterns for cassettes on the most pop brand name, and the standardized pitch (inter-cog spacing) for 7-speed cog-sets.
Some SRAM shifters, for example, GripShift types marked as MRX, are suitable for Shimano systems, since these shifters suit the so-chosen 2 : 1 family of Shimano derailleurs; in fact their shift ratios are not exactly 2 only 1.7. (Shift ratio is the reciprocal of actuation ratio which is itself the ratio of input change to output alter, then hither, one length of cable pull causes a transverse movement that exceeds information technology by 1.7 times). Other shifters by the same SRAM manufacturer, are suited to the 1:i family of derailleurs; (with exact ane.i shift ratios), and so these do not friction match the Shimano derailleurs. The subject of compatibility in drive-train gear has received much attention over the years and despite the complexities involved, it has been found that some mixed systems can piece of work well enough provided that in that location is conscientious option. (See the examples in the drop-box of the above department).
Cassette spline patterns for Shimano freehubs fit a number of other makes of cassette, and within its own products is the same for virtually every blazon of cassette. With pocket-size exceptions, the SRAM manufacturer has used the same sprocket pitch (inter-sprocket spacing) and spline pattern every bit Shimano, so that their products are used interchangeably, (with the possible exception of cog ramping functions). The tool used to remove Shimano cassette locking-rings will unlock them for all of their modernistic cassettes, and in addition, the cassette locking-rings of SRAM, SunRace, SunTour, Chris Rex and diverse others. A similar situation exists for freewheel removals, with the Shimano freewheel tool unlocking all of its ain and Sachs, Aris, and Sun Race freewheels besides. As far as is known, the Campagnolo cassette removal tool is intended only for its own locking rings, though some report that a Shimano tool is a (risky?) 'nearly fit'. The Shimano standards for spline-fittings come closest to an informal industry standard.
Vii-speed sprocket pitch is almost always 5mm , and then shifter/derailleur combinations that are designed for seven-speed use tin can be fabricated to work on all vii-speed sprocket sets, (subject to any frame fitting constraints). Consideration of the mixed shifts and pitches given elsewhere on this page will emphasize how unusual this fortunate situation is. The main consideration is that the shifter'southward cablevision-pull suits the derailleur'due south shift ratio so that between them they make the necessary 5mm gear shifts. How the necessary shift is accomplished is of no concern. For example, a Shimano 7-speed shifter pulls the cablevision by ii.ix mm while the derailleur has a shift ratio of 1.seven. The resulting product, (ii.9 mm x 1.seven = 4.93 mm), is about 5mm and so the combination works well. Another shifter and derailleur combination, say SRAM, too produces the necessary 5mm derailleur shift using 4.5 mm of cablevision pull and a derailleur shift ratio of 1.ane. (4.5mm x ane.one = 4.95mm = approx 5mm). There is little cantankerous-manufacturer consistency for the pitch of the larger sprocket-sets, so the mixing of components for these larger cog-sets needs more care. See CTC on Rear Shifting for more on mixing components of the bulldoze arrangement.
Freewheel threads on modern bikes are the same. Regardless of where in the globe the bicycle is made, the standard (ISO) for freewheel mounting threads is 1.375 inches in diameter and 24 threads per inch. This ways that any modern freewheel is likely to fit a standard threaded hub. This is not necessarily the example for older bikes, and the details for these tin can be found at Sheldon Dark-brown's Freewheels. There are a number of other ISO standards in use for bikes; see Sheldon Chocolate-brown's ISO Standards for Bikes.
Removal and Replacement [edit | edit source]

A cassette's locking band removal tool. This is typical of the tool used for Shimano freehubs. It has twelve splines.

A typical removal tool in place over a cassette's locking ring. The skewer cap is not shown.
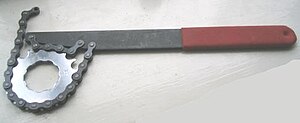
A chain whip tool shown wrapped onto a cog.
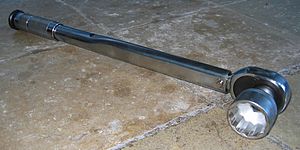
A torque wrench with a detachable socket. Twisting the handle sets a pointer at the required torque. When the torque on the nut is reached, the ratchet slips to avoid over-tightening.

Loose cogs and a locking band or final gear
The tools needed to remove and supercede cassettes differ co-ordinate to the manufacturer. The about commonly used tools include a locking ring remover (run into the image), shaped for the lock ring in utilise, and a chain-whip (see the image), a tool that engages with the cogs to preclude turning while the locking ring is being unscrewed. (A chain-whip is needed simply for cassette removal). Because the locking band remover is merely a tool-end, an extension arm or a long adaptable spanner is needed to provide the necessary torque. An external page that describes the different removal tools of various manufacturers is provided at Park Tool's Cassette and Freewheel Removal, along with other practical advice.
The tools needed for the removal of freewheels have like advent to those for cassettes, though the removal tools might not ever be interchangeable. The effort in removing a freewheel is likely to be greater than that for a cassette's locking ring owing to the freewheel's cocky-tightening during normal cycling.
The removal of cassettes and freewheels that take been in employ crave considerable force, and under force the tool might tend to slip, perhaps dissentious the tool or its receptacle. For this reason some mechanics modify the uncomplicated procedures beneath past fastening the tool in position with the reassembled quick-release wheel skewer. When this is done the skewer springs are omitted and the skewer cap is tightened confronting the removal tool to take up the slack. The tool must not exceed 1 plough with the skewer still in place, and must exist removed before completing the removal of the cassette or freewhweel.
Tools required [edit | edit source]
- Cassette locking ring or freewheel removal tool for the production in use.
- Adaptable wrench, near one foot long, or specific tools with similar leverage.
- A chain whip, for cassette removal only.
- Torque wrench, in a range that includes thirty ft.lbs: Mainly for cassette locking band replacement, (optional).
- Bench with a secure vice, (optional).
| | Few riders are lucky plenty to ain expensive torque wrenches for their bikes, so information technology might be every bit well to get the assistance of the bike shop for work that requires their utilise. That said, many are known to guess the necessary torques by judging the force applied to a wrench lever of known length. That is to say, torque is just the product of force and length. For example, a 30 ft.lb torque is applied when a thirty pound forcefulness is practical at right angles to the end of a one foot wrench. The accuracy of this method is as good as the user'south ingenuity at judging or measuring the practical forcefulness. Formulas for converting to other torque designations: |
| Technical Note: |
Cassette Removal [edit | edit source]
Howsoever the effort is eventually applied or from what bending, these directions are made assuming that the cogs of the wheel are facing y'all.
- Remove the rear wheel from the bike.
- Unscrew and remove the skewer assembly from the wheel.
- Fit the right locking ring removal tool against the locking ring. Some removal tools have their own guide rods that feed through the middle of the hub.
- Apply a chain whip to the cogs to pull them clockwise, to prevent them from turning anti-clockwise during removal.
- While holding the cogs firmly with the chain whip, turn the removal tool with the wrench or lever-arm anti-clockwise to release it. Slackening requires considerable strength, and then a longer lever arm or pipe extension might assist. It is usual to hear a clicking racket as the ring is initially released. Note that the torque wrench should never be used for heavy work of this kind.
- The cluster of cogs can then exist removed. Note the alignment and sequence of the parts for reassembly before splitting upward the cog-set. Consider stringing them together, since the spacer thicknesses might differ inside the cluster. The smallest cogs will exist noted to take built-in spacers, and perhaps shims.
For those who have a bench fitted with a suitable vice, fit the tool into the cassette in the usual way and if possible employ the skewer and its cap (no springs) to set up it in position. Having done so, and with the wheel flat and the cog-set on the underside, grip the flats of the removal tool in the vice. Hold the cogs in the concatenation-whip and with it, plow the cogs anti- clockwise, (looking downwards on top of the cycle), to release the ring. Exercise not turn the cycle to brand this release, merely use only the chain-whip, letting the cycle turn with the cogs.
Further details on the subject field of cassette removal tin exist found at Park Tool'southward Cassette and Freewheel Removal . A video that clearly shows the unlocking of a typical cassette is available at FR-5 Lock-band video.
Cassette Replacement [edit | edit source]
The replacement of a cassette does not require the use of a chain whip, and the process is otherwise merely a reverse of the removal. The process is as follows:
Howsoever the effort is somewhen applied or from what angle, these directions are fabricated assuming that the cogs of the cycle are facing you.
- Make clean the cassette and oil-wipe the cogs of the cluster. Grease the threads of the locking-ring and its receptacle.
- Fit the cassette cogs onto the freehub splines with the correct orientation. While manufacturers endeavor to ensure that only i working alignment tin be, there will no doubt exist exceptions. In addition, take care that the cassette spacers are in the correct sequence, since they are not always identical.
- Spiral on the locking band loosely into position.
- Plough the tool on the locking ring clockwise with a wrench, (no chain whip needed), to establish the manufacturer's recommended torque. In the absence of data, aim for nigh of 360in.lbs, (40N.thou), (30 ft.lbs).
Freewheel Removal [edit | edit source]
Howsoever the attempt is eventually applied or from what angle, these directions are made assuming that the cogs of the wheel are facing you.
- Remove the rear wheel from the bike.
- Unscrew and remove the skewer assembly from the cycle.
- Fit the correct removal tool into the recess in the hub. Some removal tools have their own guide rods that feed through the middle of the hub.
- Plough the removal tool with the wrench or lever-arm anti-clockwise to slacken the freewheel. Slackening requires considerable force, so a longer lever arm or piping extension might help. Consider the apply of a bench and vice if it is available. Notation that the torque wrench should never be used for heavy piece of work of this kind.
- The freewheel cluster can then be removed as a complete unit.
If a demote-vice is to be used, then offset set the removal tool in the wheel and if possible utilize the skewer and its cap (no springs) to set up it in position. Place the wheel, cogs down with the flats of the tool in the vice. Turn the wheel anti-clockwise, (looking down on height of the cycle), to unscrew the freewheel. An inflated tire gives the best grip.
Freewheel Replacement [edit | edit source]
Howsoever the endeavor is eventually applied or from what angle, these directions are fabricated bold that the cogs of the bicycle are facing you.
- Unscrew the skewer associates from the bike.
- Clean the freewheel, oil-wipe the cogs, and grease both its threads and the threads on the hub.
- Fit the freewheel onto the hub threads until it is manus tight. Tighten the freewheel further using the wrench and tool in a clock-wise direction, to obtain the torque recommended past the manufacturer. In the absence of data, aim for about of 240 in.lbs, (27 Northward.yard), (20 ft.lbs). The freewheel will tighten in use in any instance; the above figure is given to avoid dubiety at the point of delivery.
There is little reward in making utilize of a vice for the freewheel fitting, merely for those who intend to exercise then, they can notice a method at Park Tool's Cassette and Freewheel Removal.
Gearing Calculations [edit | edit source]
This department provides the rudimentary calculations associated with bicycle gearing.
Altitude Shifted [edit | edit source]
In all indexed shifting, (as opposed to friction shifting), there is a fundamental relation to describe the transverse altitude that a derailleur cage shifts across the cog-set up or chainrings. The transverse distance shifted is equal to the production of the shifter's cable pull and the derailleur'south shift ratio. In practice, the distance shifted must equal the heart to heart spacing of the cogs, (or chainrings). Most modern rear-shifting is indexed, and some front-shifting is indexed (for example, Shimano). Meet Gear Changing Dimensions for a selection of such data.
Transverse Distance of Derailleur Cage = Shifter Cablevision Pull x Derailleur Shift Ratio For example: For a 7-speed rear cogset, a Shimano rear derailleur, and a SRAM MRX twist vii-speed shifter; we accept; Transverse Altitude of Derailleur Cage = one.7 ratio x 2.9mm cable pull = iv.93mm Approximately 5mm This suits all 7 speed center to heart spacings since they are all set at 5mm centers.
Derailleur Chapters [edit | edit source]
When a rear-derailleur is planned or when an existing chain ring or cogset is changed, the required total chapters of the derailleur needs to be checked. The total capacity refers to the ability of the derailleur to take up slack across the unabridged range of gear combinations. Since the gear combinations are afflicted past the range of both the chain rings and the rear cogset, these are both represented in the calculation. The required capacity of the rear derailleur becomes:
Minimum Required Capacity = (Largest cog - Smallest cog) + (Largest chainring - Smallest chainring) For example: For a cogset 11T - 30T with only one chainring of 38T; we accept; Minimum Required Capacity = (30T - 11T) + (38T - 38T) = 19T The 'total capacity' spec for the derailleur must be at least 19T. Some other case: For a cogset 11T - 28T and chain rings xx, 30, and 42; we have; Minimum Required Capacity = (28T - 11T) + (42T - 20T) = 39T The 'total capacity' spec for the derailleur must exist at least 39T.
Other consideraions within a derailleur'southward specification sheet include front chain band molar departure and smallest and largest rear cog sizes. This latter requirement ensures that every bit the derailleur traverses the cogs on its in-built slope, the clearance of the muzzle, as fix by the 'b-top' aligning, is reasonably consistent. Attention should also exist paid to the number of gears for which the derailleur is intended, and whether or not the shifter is compatible with its shift ratio.
Gear-Inches and Ground Covered [edit | edit source]
Gear inch calculations are used by those who programme the design of cycle gearing, and are useful when a new bike is being considered. They let a tabular layout where the gears associated with adjacent concatenation rings can exist studied for their overlap and convenience, and allow a purchaser to predict whether or not an intended ride volition have a similar sweetness spot, or experience, like their existing wheel. Multiplying the gear-inch figure by the constant pi (approximately iii) gives the distance covered by one complete turn of the pedals. Calculations are made for each gear combination of front chain ring and rear sprocket. The formula for any one combination is just:
Gear Inches = Outside Inch-Bore of driven Bicycle Bicycle 10 (Size forepart chain ring / Size rear sprocket) For example: For an 11T rear sprocket and a 38T chain band, with a 26 inch rear wheel diameter, we have: Gear Inches = 26 10 (38T / 11T) = 89.eight and the distance covered in one turn of pedals is: Distance (inches) = ''gear-inches X pi'' = 89.8 x 3.142 = 282.2 inches = 23.v feet for one turn of the pedals.
It is usual to make a table of the gear inches and and then possibly another table showing the change in gear inches betwixt side by side gears. This permits an understanding of the relative effort required in the apply of next gears. An on-line estimator that saves some work tin can be establish at Gears by Sheldon Brown . A typical gear-inch table is shown below, and although it is non entirely obvious in this example, for convenient arrangements, the top figure of each cavalcade is most usually establish in the middle of the next column to its right.
| Gear Inches | 20T Chain Ring | 30T Chain Ring | 38T Chain Ring |
|---|---|---|---|
| 11T cog | 47 | 71 | 90 |
| 13T cog | twoscore | sixty | 76 |
| 15T cog | 35 | 52 | 66 |
| 18T cog | 29 | 43 | 55 |
| 21T cog | 25 | 37 | 47 |
| 24T cog | 22 | 33 | 41 |
| 30T cog | 17 | 26 | 33 |
Run across also [edit | edit source]
- Gear-changing Dimensions : A page devoted to the dimensions of gear shifting
External links [edit | edit source]
- Park Tool Repair Help
- Cassettes & Freehubs by Sheldon Brown
- Gears by Sheldon Dark-brown : A gear-inches figurer using wheel diameter; see beneath for wheel circumference.
- Spacing Cribsheet by Sheldon Brownish: Details of many cogsets, with pitch, cog thickness, and spacer thickness given, equally well as overall hub apply.
- Rear Shifting (Mixing Systems) by CTC - the Uk's national cyclists' organisation.
- Gearing 101 by The Cycling Site
- SRAM Service Page Links by SRAM
- SRAM Tech Manual 2010 past SRAM
- SHIMANO techdocs links by Shimano
- Campagnolo Technical Documentation by Campagnolo
- Campagnolo Gear-Inches Computer past Campagnolo : Uses wheel circumference.
DOWNLOAD HERE
What Gear Is Usually Used in a Shimano 11 Speed UPDATED
Posted by: dorothypaland.blogspot.com